Friday, October 7, 2011

Mac OS X Snow Leopard on Intel i3,i5 and i7 Processors With VirtualBox

Snow Leopard on Intel i3,i5 i7 processors
Installing Mac OS X Snow Leopard on latest Intel i3 and i5 processors with VirtualBox is slightly difficult job than installing on older processors. Our readers reported several failure attempts by earlier methods on i series. Already two posts published to solve this issue. This post just to summarize the both methods to install Mac OS X Snow Leopard on Intel i3,i5 and i7 processors with VirtualBox on your desktop or laptop computers.
I’m not showing any installation steps here, but existing articles will be useful here. As you must aware, VirtualBox doesn’t support Mac guest officially. It’s built-in EFI loader doesn’t work with original retail installation medium. Therefore, we have to use third party boot loaders to start up the installation and boot OS from installed disk normally. When these boot loaders unable to identify or communicate to physical latest Intel processors , we get problem.
The following steps go with two latest boot loaders specifically designed for i3,i5 and i7 processors to install Snow Leopard on desktop or laptop.
Get the original Snow Leopard retail DVD

1) Install with iBoot Boot loader for i3 and i5 processors.

This is a famous boot loader to install Snow Leopard physically on local hard disk, which will allow to have multi boot option with other existing Operating Systems on i series processors. Here, we use the same iBoot to install on virtualization platform. It works better.
The developer of this products confirms it works on i series. The original boot loader available for download with more information here.
I have explained step by step to use iBoot with VirtualBox to install Snow Leopard on i3 and i5 intel processors. This can be updated to 10.6.4 also.
Snow Leopard on Intel i3,i5 i7 processors
MultiBeast to be installed after the OS X installation to boot directly from installed hard disk.
Snow Leopard on Intel i3,i5 i7 processors
More steps available here.

2) Install with EmpireEFI boot loader.

Developer released updated version for Intel i3 and i5 including mobile processors. Older EmpireEFI worked well on core2duo and dual core processors. You can try this if above method one fails. There are some issues on this installation which mentioned in this post.
Snow Leopard on Intel i3,i5 i7 processors
Installation guide is available here.

3) This is an optional and I’m not sure it will work.

Please share your experience on this.
The above two methods can be used to install vanilla kernel (original Snow Leopard installation) without any hacks or hackintosh versions on i3 and i5 computers. This method is available to install hackintosh version of Snow Leopard 10.6.2 Intel AMD by Hazard on VirtualBox. This ISO works without any boot loaders, which means, you do not need to use iBoot or EmpireEFI. The built in VirtualBox EFI boot loader managed to start up the installation from ISO and boot the OS from installed hard disk later.
Therefore, this may work on i3, i5 and i7 processors as longs as VirtualBox EFI boot loader works well. I suggest to use this way only if the above two methods failed.
desktop virtualization software
Read the original post to use Hazard on VirtualBox
Unfortunately, I can’t test and confirm any of the methods on Intel i series processors, because I don’t have it. But, comments from these posts and developers’ blogs shows these methods should work mostly.
Feel free to share your success and failure stories. Let’s help others by specifying your system configuration also.
Have Fun.

Recommended Posts

Thursday, October 6, 2011

Mac OS X Snow Leopard 10.6.6 Universal (2011/MULTILANG)

 
MacOS X Snow Leopard 10.6.6 Universal (2011/MULTILANG) | 4.37 GB

MacOSX Snow Leopard – the universal distributive? which supported the basic configuration of personal computers and laptops. This distribution was developed based on the source of the original version.
Loss of quality and functionality has not happened. All the software will work the same way as on a genuine Mac. If you have not found a list of supported hardware, you only need to find and install not getting driver
 Download:

Wednesday, October 5, 2011

[Guide] How to Install Mac OS X Snow Leopard in VirtualBox with Non Apple, Intel PC

install Mac os x Snow Leopard on VirtualBox

After several days of attempts and findings, finally I managed to install Mac OS X  Snow Leopard in VirtualBox 3.2 in non Apple Intel PC.  This guide explains step by step methods involved in how  to install snow leopard in VirtualBox 3.2.
This method is completely for testing and learning purpose.  Do not use for permanent or in production use. Please buy original Mac OS and Apple hardware. Oracle VirtualBox 3.2 officially supports Mac OS X as guest on Apple hardware only. But still it’s possible to install Mac OS X on non Apple hardware with different boot loaders

UPDATE – 17-02-2011

Intel i-series processor users- Check this other guide with three methods suitable for Intel i3,i5 and i7 processors.

Check this post – This same guide re-written with several major issues fixed and how to update to 10.6.5

When you updating to latest 10.6.6, make sure to check few considerations at end of this guide.

The good thing is, you do not require any hacked Mac OS X installation DVDs or ISO files. Use your original Snow Leopard retail DVD or ISO file.

Required Products to Install Mac OS X Snow Leopard 10.6.3 on Oracle VirtualBox 3.2

1) Oracle VirtualBox 3.2 ( Read more and download from here)
2) Mac OS X 10. 6 Snow Leopard Retail DVD or ISO
3) EmpireEFIv1085.iso for Intel Processors (This is the boot loader we will be using to boot Mac, download the correct version here)
Updated-
EmpireEFI Boot loader for AMD processor
4) VT Checker (Read more here and make sure Hardware Virtualization is enabled is Host BIOS)
5) Sound driver (Mentioned under sound)
Demonstration PC configuration
1) Intel Core2Duo 2.66GHz (VT Enabled, 64 Bit Architecture supports)
2) 3GB RAM
3) Intel P35 Chipset
4) Windows 7 32 Bit

Step by Step Installation of Mac 10.6.3 on VB3.2

1) Create a Mac OS X Virtual Machine with following configuration ( If you have latest VB, then select Mac Server version)
More information on installing SL on VB 3.2.6

install Mac os x Snow Leopard on VirtualBox
Memory – Minimum 1GB
Processor Cores
– 1 or more (Change it to one core if you face any issues. Two cores worked for me)
Enable PAE/NX, VT-x,
Nesting Page
– Enabled
Enable IO APIC and Enable Absolute pointing device.
Remove Enable EFI
. Built in EFI loader may work with apple hardware only.
install Mac os x Snow Leopard on VirtualBox
Enable 3D Acceleration under display and setup maximum video memory.
Storage Controller type ICH6
and create a 20 GB Hard disk.
2) Mount empireEFIv1085.iso to CD drive. Make CD ROM as first boot device. Keep your Snow Leopard DVD or ISO file ready.
3) Start the virtual machine. When following screen appears, eject loader ISO and load Mac installation DVD or ISO.
To do it, right click on CD drive and select drive or ISO image.  Wait a bit , Press F5 and ENTER Key when DVD loaded.
install Snow Leopard on VirtualBox 3.2
4) Wait for some time. If you see installation screen, you are almost done. Go through the installation process.
Go to disk utility and create a partition if you can’t see installation disk.
5) I got the following warning message at end of installation. It’s not an issue, just restart the Virtual machine.
Note – Shutdown and Restart will not happen normally, you have to do it manually from VirtualBox console. You have to load empireEFI ISO again to load from installed hard disk.
install Mac os x Snow Leopard on VirtualBox
6) This time, select mac hard disk by right arrow key and press Enter to boot. I’m sure after several initial configurations you will land on Snow Leopard desktop successfully.

Let’s Check and Fix Some Issues in Snow Leopard in Oracle VirtualBox 3.2

1) Network Network worked out of the box. NAT and Bridged type worked without any patches.
install Snow Leopard on VirtualBox 3.2
2) 10.6.3 Update in VirtualBox Mac OS X Guest Yes, it worked. I downloaded combo update and successfully updated.
updated-
10.6.4 update also worked nicely with this method.
install Snow Leopard on VirtualBox 3.2
3) USB Support It worked well. Somehow data transfer is little slow, but manageable.  It detected my USB hard disk and flash drive.
usbsupport
4) Sound in Mac OS X Guest Sound is a little issue here, but worked. I’m sure you are not going to connect 5.1 speakers, watch movies and listen songs. So follow these steps to install Sound drivers. For me it worked, one side speaker worked with little distraction.  Something is better than nothing.
install Mac Snow Leopard 10.6.3 in Oracle VirtualBox 3.2
Updated- Try this driver for easy installation through pkg file.
If you are not happy with it then try manual method.
Download this driver file; extract the AppleAC97Audio.kext file on Snow Leopard desktop.
Open Terminal, (/applications/utilities/terminal.app) Type sudo -s in terminal then your admin password following this, now you should be root.
Type
 sudo mv /users/(YOUR USERNAME)/desktop/AppleAC97Audio.kext /system/library/extensions
At this point the file AppleAC97Audio.kext should have disappeared from the desktop.
Type
sudo chmod -R 755 /System/Library/Extensions/AppleAC97Audio.kext
Type
sudo chown -R root:wheel /System/Library/Extensions/AppleAC97Audio.kext
Now, CLOSE TERMINAL, then go to /system/library/caches/com.apple.kext.caches/ and trash Extensions.mkext (This cache will regenerate automatically on boot with the current kext library) Reboot and enjoy sound support! Original Source is here.
5) Screen Resolution and Screen Size Follow the steps to adjust screen size. Wide screen size didn’t work for some users.
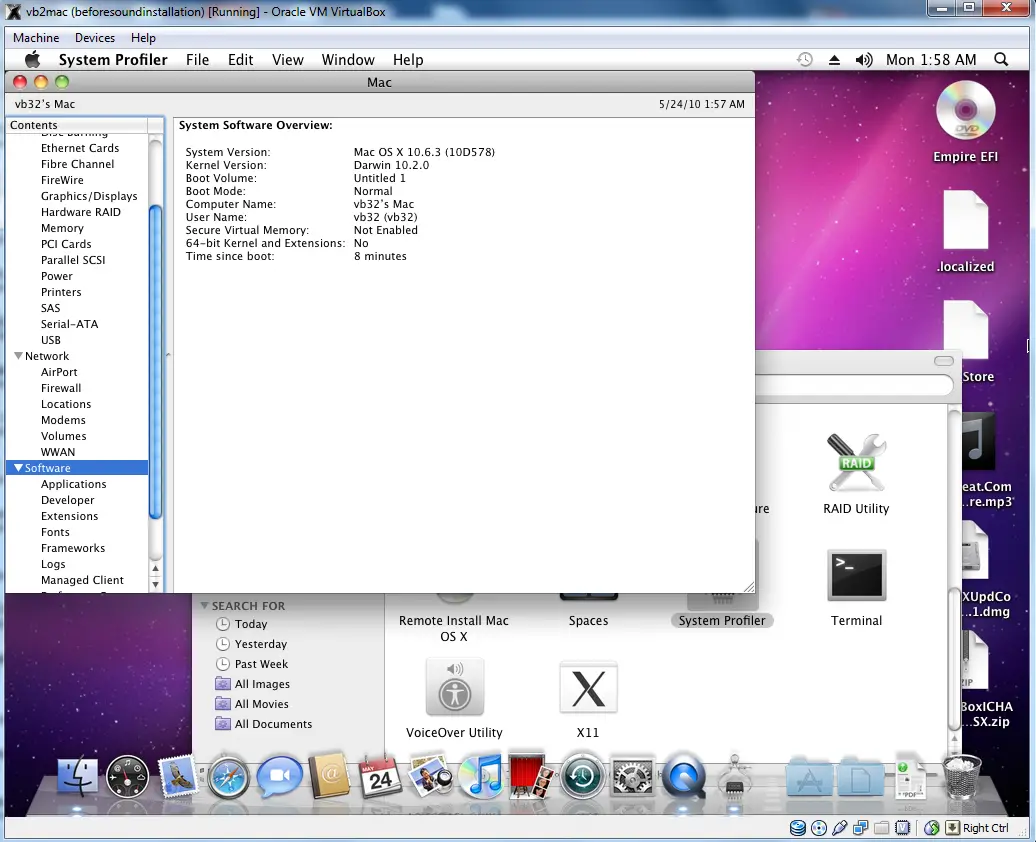
6) Shutdown and Restart We can’t shutdown or restart Mac VM normally. You may see messages showing ‘CPU halted’ (for Shutdown) or ‘MACH Reboot’ (for restart), this means nothing will happen after it. Power off or reset virtual machine from VirtualBox console. Here is the working Snow Leopard Guest on VirtualBox 3.2.
workingmac
7) Update 1
Install Boot Loader permanently and some fixes
To avoid attaching empireEFI ISO every time and boot OS X virtual machine, you can install boot loader permanently on mac local hard disk. This method will install Chameleon boot loader, and some other drivers and fixes.
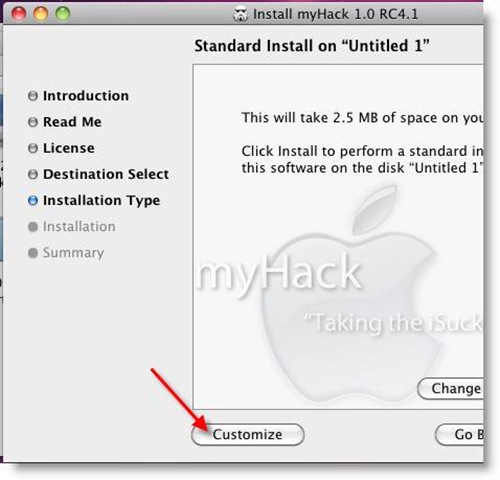
Go to Empire EFI CD, which already mounted and open Post Installation folder. Take a snapshot before do anything at this point. Run myHack Installer Package.

install Mac Snow Leopard 10.6.3 in Oracle VirtualBox 3.2
Select Customize in Installation Type.
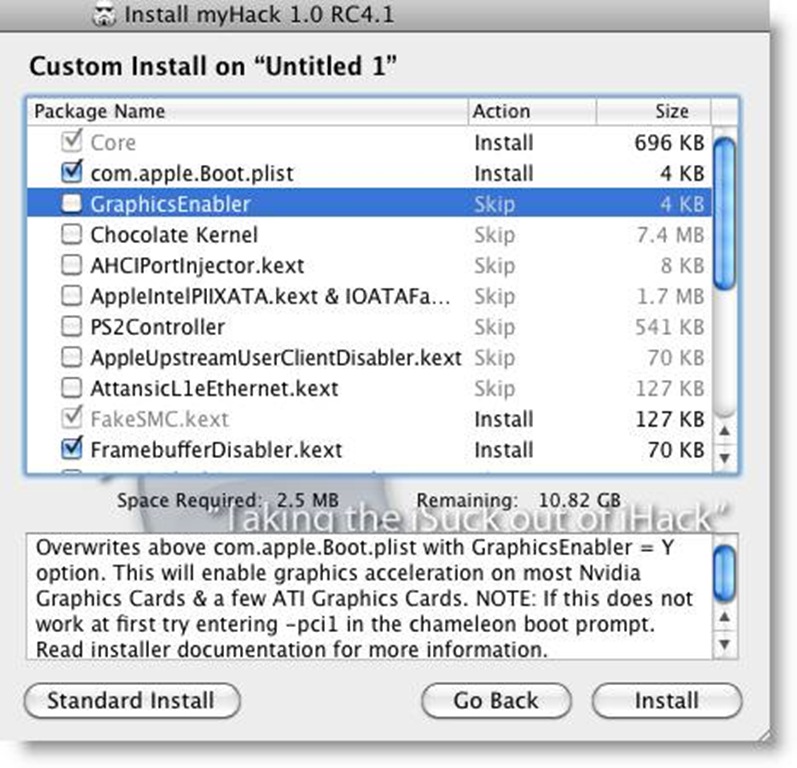
Read each package description and select if it requires for your hardware. I recommend to not deselecting anything, which selected by default. Press Install button to continue. install Mac Snow Leopard 10.6.3 in Oracle VirtualBox 3.2
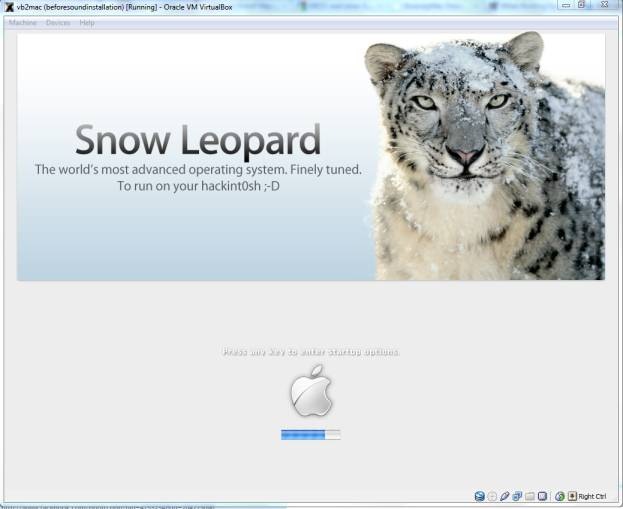
After successful installation, remove empireEFI ISO. Start virtual machine, it should boot from hard disk as shown below.
install Mac Snow Leopard 10.6.3 in Oracle VirtualBox 3.2
If this doesn’t work, restore VM to last snapshot and install Chameleon boot loader from separate installation file in Post Installation folder. After this installation, boot loader worked and I can see good performance in OS X virtual machine on my Intel Core2Duo PC.
8.) Update 2
Some fixes for booting issues
a) Mac DVD reading error EBIOS read error: Error 0×0c Block 0×1ed48a Sectors 0 This is due to accessing data from Mac retail DVD to VB. Convert DVD with some cloning software to ISO. More people faced same issue and solutions are suggested here.
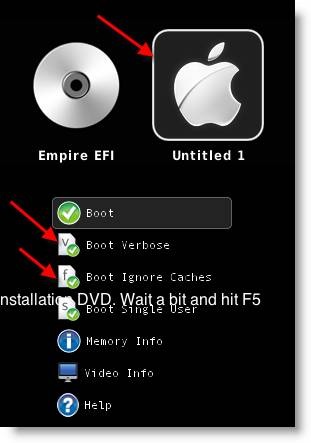
b) Booting errors after installation. Try with verbose or Boot Ignore Caches. In empireEFI boot loader, go to mac disk by pressing right arrow key. Once it’s selected, press down arrow key that will bring more options. Select and press Enter.
install Mac Snow Leopard 10.6.3 in Oracle VirtualBox 3.2
c) Change Boot Loader For old type processors, select legacyempire_efi1085.iso, which will be in same folder.
if this boot loader and method doesn’t work on Intel processor then try this method with different iboot loader.
9) Shared folder between mac guest and Windows host, read this post ( Point 3) Network required.
10) Update 3 ( 17-02-2011)
  • USB disks access gives trouble with same guide in Oracle VirtualBox 4. Snow Leopard virtual machine crashes when trying to explore USB storages such as flash disk and external hard disk.  If you face the same problem, then check this guide how to fix this issue.
  • IOUSBFamily.kext and IOUSBMassStorageClass.kext files should be replaced to older version immediately after the software or manual update to 10.6.5 or 10.6.6 before restart. If not, USB mouse,keyword, USB storage devices may stop working after the update.  Read this guide on fixing USB issues after update.

Again, this method is just for learning and testing purpose. Feel free to share your comments and issues you face. I’m not Mac or VB expert, but I will try my best to help you.
Don’t miss subscribing to sysprobs.
Have Fun.

Recommended Posts

Tuesday, October 4, 2011

Whats New in Oracle VirtualBox 3.2, Final Version Available for Download

Major versions of VirtualBox 3.2 released. It’s available for download from official site here. As I mentioned in earlier 3.2 beta post, name has completely changed to Oracle VirtualBox.
What’s new in Oracle VirtualBox 3.2? Lot of changes and new features added in Performance, Power and Platforms. The complete cool new features in VirtualBox 3.2 available here. Mac OS X guest is supported officially for Mac hardware.
Whats New Oracle VirtualBox 3.2 download
Here is the sentence I like from Oracle VirtualBox,
“ VirtualBox is the first product to provide the modern PC architecture expected by OS X without requiring any “hacks”.“
More from source

Download the latest VirtualBox 3.2 here. Enjoy the power of desktop virtualization.
Subscribe to sysprobs and be in touch with latest news and how-to’s in VirtualBox 3.2. Find out more topics about VirtualBox here.

Recommended Posts

Monday, October 3, 2011

How to use iBoot loader with VirtualBox to Install Snow Leopard


iBoot is another good boot loader to install Mac OS X on Physical Intel computer or desktop virtualization software Oracle VirtualBox. Follow this method if you failed with EFI Boot loaders or any. This post explains How to iBoot loader with VirtualBox to Install Snow Leopard and upgrade to latest version 10.6.4.
This boot loader looked pretty good and I’m hoping this will work with most of the 32 bit and 64 bit Intel processors, not sure for AMD.

Required Products

1) Oracle VirtualBox latest version
2) iBoot boot loader ( Its is available here)
Download all three versions. Use the correct ATI or NVIDIA version depends on your physical display card. If nothing works then use ‘supported’ version.
In this example I uses NVIDIA version.
3) Get Mac OS X Snow Leopard DVD here or  ISO file. ( if you have physical DVD, better make it ISO)
4) Make sure Virtualization Technology (VT) enabled on physical computer BIOS, Read here.
As usual I’m showing this on my Intel Core2duo 2.66GHZ, 3GB, Windows 7 32 Bit computer.
This boot loader works with Intel processors only, it may fail for AMD users.

Follow the steps to use iBoot loader on VirtualBox.

1) Create a new Virtual machine.
Select Mac OS X Server as guest OS.
1.5GB RAM, 20 GB new hard disk (Attach it to SATA)
VT, Nesting Pageing and PAE enabled.
Remove EFI boot loader option under system. (To avoid booting from VirtualBox built in EFI loader)
Allocate Video memory to maximum and select 3D acceleration under Display option.
See Also
How to install Mac OS X Snow Leopard on VirtualBox with empireEFI Boot loader.
How to install Mac OS X Leopard 10.5 on VirtualBox with pre-installed VMDK image.
2) Mount appropriate iBoot boot loader ISO to CD Drive through Virtual Media manager.
3) Switch on Virtual machine. You can see a screen as shown below, waiting for user input. Don’t press any keys.
iBoot loader with VirtualBox to Install Snow Leopard
4) Now unmount iBoot ISO and load Mac OS X ISO file. To do it,
Right Click on CD icon on VirtualBox console and select More CD/DVD Images option as marked by arrows.
In Virtual media manager, browse for Snow leopard ISO file and press OK. When you see the same screen again, Press F5 to refresh CD ROM then ENTER Key.
5) I’m sure first installation screen will start normally.
iBoot loader with VirtualBox to Install Snow Leopard
6) When no disks listed for installation the go to utilities, disk utility and select virtual hard disk. Create a partition and give a name. Close the disk utility box once all done; newly created partition will be appeared for installation now. Select it and continue installation ( on same screen select customize and remove printer drivers and language option to save time and disk space)
iBoot loader with VirtualBox to Install Snow Leopard
7) Have you got “Install Failed” message at end of installation? Don’t bother.
Just restart the virtual machine, that will also not work. You have to do it from VB console (Machine-> ACPI Shutdown and power off)
8.) Make sure to load iBoot boot loader to CD ROM before it starts, if not
“FATAL: No bootable medium found! System halted” error will appear.
Mac OS X requires proper boot loader to boot from disk on non apple hardware.
9) On next screen, press Right Arrow Key, select Mac hard disk and ENTER.
mac_disk_selection
10) There you go! It will start with identifying keyboard (ignore it by pressing escape key) and first initial configuration. Finally you land on working snow leopard desktop with VirtualBox and iBoot.
iBoot loader with VirtualBox to Install Snow Leopard
11) Some post installation configurations and checkups.
Network – Worked out of the box.
USB support, 10.6.4 update (Manual or software update), Shutdown and Restart problems, and Shared folders between Mac OS X Guest and Windows Host – Please check this earlier post.
12) Boot from Hard Disk without iBoot boot loader
Make sure you take a snapshot before continue.
To boot from hard disk, you need to install a package called ‘MultiBeast’. Either download it from inside Mac VM or transfer from USB disk. After unzipping open MultiBeast.pkg.
Under custom install select ‘EasyBeast for Supported CPU’ option which supports Intel i5,i7, core and core2 CPUs. Description for each option can be viewed at bottom of box.
multibeast_installation
Do not press continue button, go to next step for more settings. (I already installed it, so getting Upgrade option)
13) Screen Size of Snow Leopard Virtual machine
Each boot loaders install separate com.apple.boot.plist file to get special feature options during boot up. Install this file to change screen size resolution.
In same Multibeast custom installation, go to advanced options and click on com.apple.boot.plist.
Either select Verbose or Apple boot screen mode but select correct bit version. I selected 32 Bit Apple Boot Screen since my host is 32 Bit and any time I can type –v on booting screen to get verbose mode.
Once installation completed, follow the steps here to change screen resolution of Mac VM.
14) Sound
Several sound driver installation options available under Advanced options -> Kexts -> Audio. I had a hope and tried all, but nothing worked. These kexts made Mac OS X to talk directly to physical sound, network or graphics chipsets, but it’s not possible under desktop virtualization. VirtualBox can’t pass signals to physical hardware as it doesn’t support Mac OS X guest officially.
With little bit hope you can visit this sound driver page and install it.
I’m happy with this driver as long as I hear some sound and identify it.
That’s it. Installation and post configurations are done. Please note, you can’t get all features from this Virtual machine and it’s not recommended for long term use.
I suggest using it for learning purpose before you buy original hardware and software from Apple.
Share your success and failures of this installation method.
Subscribe to sysprobs and follow me to get latest updates on desktop virtualization.
Have Fun

Recommended Posts

Sunday, October 2, 2011

Installing Mac OS using virtualbox 3.2

[Guide] How to Install Mac OS X Snow Leopard in VirtualBox with Non Apple, Intel PC
May 24, 2010 By Dinesh 413 Comments
install Mac os x Snow Leopard on VirtualBox

After several days of attempts and findings, finally I managed to install Mac OS X  Snow Leopard in VirtualBox 3.2 in non Apple Intel PC.  This guide explains step by step methods involved in how  to install snow leopard in VirtualBox 3.2.

This method is completely for testing and learning purpose.  Do not use for permanent or in production use. Please buy original Mac OS and Apple hardware. Oracle VirtualBox 3.2 officially supports Mac OS X as guest on Apple hardware only. But still it’s possible to install Mac OS X on non Apple hardware with different boot loaders

    UPDATE – 17-02-2011
    Intel i-series processor users- Check this other guide with three methods suitable for Intel i3,i5 and i7 processors.
    Check this post – This same guide re-written with several major issues fixed and how to update to 10.6.5
    When you updating to latest 10.6.6, make sure to check few considerations at end of this guide.

The good thing is, you do not require any hacked Mac OS X installation DVDs or ISO files. Use your original Snow Leopard retail DVD or ISO file.

    Required Products to Install Mac OS X Snow Leopard 10.6.3 on Oracle VirtualBox 3.2

1) Oracle VirtualBox 3.2 ( Read more and download from here)

2) Mac OS X 10. 6 Snow Leopard Retail DVD or ISO

3) EmpireEFIv1085.iso for Intel Processors (This is the boot loader we will be using to boot Mac, download the correct version here)
Updated- EmpireEFI Boot loader for AMD processor

4) VT Checker (Read more here and make sure Hardware Virtualization is enabled is Host BIOS)

5) Sound driver (Mentioned under sound)

Demonstration PC configuration

1) Intel Core2Duo 2.66GHz (VT Enabled, 64 Bit Architecture supports)

2) 3GB RAM

3) Intel P35 Chipset

4) Windows 7 32 Bit

    Step by Step Installation of Mac 10.6.3 on VB3.2

1) Create a Mac OS X Virtual Machine with following configuration ( If you have latest VB, then select Mac Server version)
More information on installing SL on VB 3.2.6

install Mac os x Snow Leopard on VirtualBox

Memory – Minimum 1GB
Processor Cores – 1 or more (Change it to one core if you face any issues. Two cores worked for me)
Enable PAE/NX, VT-x,
Nesting Page – Enabled
Enable IO APIC and Enable Absolute pointing device.
Remove Enable EFI. Built in EFI loader may work with apple hardware only.

install Mac os x Snow Leopard on VirtualBox

Enable 3D Acceleration under display and setup maximum video memory.
Storage Controller type ICH6 and create a 20 GB Hard disk.

2) Mount empireEFIv1085.iso to CD drive. Make CD ROM as first boot device. Keep your Snow Leopard DVD or ISO file ready.

3) Start the virtual machine. When following screen appears, eject loader ISO and load Mac installation DVD or ISO.

To do it, right click on CD drive and select drive or ISO image.  Wait a bit , Press F5 and ENTER Key when DVD loaded.

install Snow Leopard on VirtualBox 3.2

4) Wait for some time. If you see installation screen, you are almost done. Go through the installation process.

Go to disk utility and create a partition if you can’t see installation disk.

5) I got the following warning message at end of installation. It’s not an issue, just restart the Virtual machine.

Note – Shutdown and Restart will not happen normally, you have to do it manually from VirtualBox console. You have to load empireEFI ISO again to load from installed hard disk.

install Mac os x Snow Leopard on VirtualBox

6) This time, select mac hard disk by right arrow key and press Enter to boot. I’m sure after several initial configurations you will land on Snow Leopard desktop successfully.

    Let’s Check and Fix Some Issues in Snow Leopard in Oracle VirtualBox 3.2

1) Network Network worked out of the box. NAT and Bridged type worked without any patches.

install Snow Leopard on VirtualBox 3.2

2) 10.6.3 Update in VirtualBox Mac OS X Guest Yes, it worked. I downloaded combo update and successfully updated.
updated- 10.6.4 update also worked nicely with this method.

install Snow Leopard on VirtualBox 3.2

3) USB Support It worked well. Somehow data transfer is little slow, but manageable.  It detected my USB hard disk and flash drive.

usbsupport

4) Sound in Mac OS X Guest Sound is a little issue here, but worked. I’m sure you are not going to connect 5.1 speakers, watch movies and listen songs. So follow these steps to install Sound drivers. For me it worked, one side speaker worked with little distraction.  Something is better than nothing.

install Mac Snow Leopard 10.6.3 in Oracle VirtualBox 3.2

Updated- Try this driver for easy installation through pkg file.

If you are not happy with it then try manual method.

Download this driver file; extract the AppleAC97Audio.kext file on Snow Leopard desktop.

Open Terminal, (/applications/utilities/terminal.app) Type sudo -s in terminal then your admin password following this, now you should be root.

Type

 sudo mv /users/(YOUR USERNAME)/desktop/AppleAC97Audio.kext /system/library/extensions

At this point the file AppleAC97Audio.kext should have disappeared from the desktop.

Type

sudo chmod -R 755 /System/Library/Extensions/AppleAC97Audio.kext

Type

sudo chown -R root:wheel /System/Library/Extensions/AppleAC97Audio.kext

Now, CLOSE TERMINAL, then go to /system/library/caches/com.apple.kext.caches/ and trash Extensions.mkext (This cache will regenerate automatically on boot with the current kext library) Reboot and enjoy sound support! Original Source is here.

5) Screen Resolution and Screen Size Follow the steps to adjust screen size. Wide screen size didn’t work for some users.

6) Shutdown and Restart We can’t shutdown or restart Mac VM normally. You may see messages showing ‘CPU halted’ (for Shutdown) or ‘MACH Reboot’ (for restart), this means nothing will happen after it. Power off or reset virtual machine from VirtualBox console. Here is the working Snow Leopard Guest on VirtualBox 3.2.

workingmac

7) Update 1

Install Boot Loader permanently and some fixes

To avoid attaching empireEFI ISO every time and boot OS X virtual machine, you can install boot loader permanently on mac local hard disk. This method will install Chameleon boot loader, and some other drivers and fixes.

Go to Empire EFI CD, which already mounted and open Post Installation folder. Take a snapshot before do anything at this point. Run myHack Installer Package.

Select Customize in Installation Type. install Mac Snow Leopard 10.6.3 in Oracle VirtualBox 3.2

Read each package description and select if it requires for your hardware. I recommend to not deselecting anything, which selected by default. Press Install button to continue. install Mac Snow Leopard 10.6.3 in Oracle VirtualBox 3.2

After successful installation, remove empireEFI ISO. Start virtual machine, it should boot from hard disk as shown below. install Mac Snow Leopard 10.6.3 in Oracle VirtualBox 3.2

If this doesn’t work, restore VM to last snapshot and install Chameleon boot loader from separate installation file in Post Installation folder. After this installation, boot loader worked and I can see good performance in OS X virtual machine on my Intel Core2Duo PC.

8.) Update 2

Some fixes for booting issues

a) Mac DVD reading error EBIOS read error: Error 0×0c Block 0×1ed48a Sectors 0 This is due to accessing data from Mac retail DVD to VB. Convert DVD with some cloning software to ISO. More people faced same issue and solutions are suggested here.

b) Booting errors after installation. Try with verbose or Boot Ignore Caches. In empireEFI boot loader, go to mac disk by pressing right arrow key. Once it’s selected, press down arrow key that will bring more options. Select and press Enter. install Mac Snow Leopard 10.6.3 in Oracle VirtualBox 3.2

c) Change Boot Loader For old type processors, select legacyempire_efi1085.iso, which will be in same folder.

if this boot loader and method doesn’t work on Intel processor then try this method with different iboot loader.

9) Shared folder between mac guest and Windows host, read this post ( Point 3) Network required.

    10) Update 3 ( 17-02-2011)

    USB disks access gives trouble with same guide in Oracle VirtualBox 4. Snow Leopard virtual machine crashes when trying to explore USB storages such as flash disk and external hard disk.  If you face the same problem, then check this guide how to fix this issue.

    IOUSBFamily.kext and IOUSBMassStorageClass.kext files should be replaced to older version immediately after the software or manual update to 10.6.5 or 10.6.6 before restart. If not, USB mouse,keyword, USB storage devices may stop working after the update.  Read this guide on fixing USB issues after update.

Again, this method is just for learning and testing purpose. Feel free to share your comments and issues you face. I’m not Mac or VB expert, but I will try my best to help you.

Don’t miss subscribing to sysprobs.

Have Fun.
Recommended Posts

    The Top Ten Articles of 2010 in Virtualization and Windows 7 at Sysprobs
    How to use iBoot loader with VirtualBox to Install Snow Leopard
    How to Increase Mac OS X Snow Leopard Virtual Machine Screen Resolution on VirtualBox and VMware
    How to Install Mac OS X 10.5.5 Leopard on VirtualBox 3.1.4

Saturday, October 1, 2011

Paradise Lost - Say just words to me

Συγκρότημα: Paradise Lost
Τίτλος Τραγουδιού: Say Just Words to Me
Άλμπουμ: One Second
Είδος: Gothic Metal
Χώρα: Ηνωμένο Βασίλειο
Πόλη: Χάλιφαξ, Αγγλίας
Ημερομηνία Κυκλοφορίας: 14 Ιουλίου 1997